|
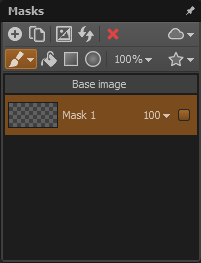
SNS-HDR provides a mask system that allows you to adjust the parameters of any area of the image. Each mask has its own set of parameters that correct the base parameters.

Creating a mask
To create a mask, click the  icon located in the masks window. A mask can also be created by copying an existing mask, by clicking the icon located in the masks window. A mask can also be created by copying an existing mask, by clicking the  icon.
After creating a mask, you can give it a name. icon.
After creating a mask, you can give it a name.
A newly created mask has temporary full opacity, which means that changing the image parameters for the mask affects the entire image.
The opacity is temporary because it is not taken into account when saving the image and it remains active only until the mask is modified. Temporary opacity is represented by a checkerboard pattern.
A mask can be filled using the available tools.
- Brush
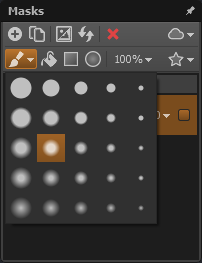
 - allows you to draw any shape. From the menu, opened by clicking the arrow next to the brush icon,
you can choose the brush size and its hardness. - allows you to draw any shape. From the menu, opened by clicking the arrow next to the brush icon,
you can choose the brush size and its hardness.
These parameters can also be adjusted using the [, ], Ctrl+[ and Ctrl+] keys.
- Fill
 - allows you to fill an area. This tool is only useful in combination with the Auto mask option.
This combination allows you to quickly select an area of the image with a similar color or brightness. - allows you to fill an area. This tool is only useful in combination with the Auto mask option.
This combination allows you to quickly select an area of the image with a similar color or brightness.
- Linear gradient
 - allows you to fill an area with a linear gradient.
In combination with the Auto mask option, it allows you to fill an area with a similar color or brightness with a gradient.
It is possible to create perfectly horizontal and vertical gradients. To do this, after clicking and holding the mouse button, press the SHIFT key and continue the selection.
The most recently created but not yet committed gradient can be removed by pressing the ESC key. - allows you to fill an area with a linear gradient.
In combination with the Auto mask option, it allows you to fill an area with a similar color or brightness with a gradient.
It is possible to create perfectly horizontal and vertical gradients. To do this, after clicking and holding the mouse button, press the SHIFT key and continue the selection.
The most recently created but not yet committed gradient can be removed by pressing the ESC key.
- Radial gradient
 - allows you to fill an area with a radial gradient.
In combination with the Auto mask option, it allows you to fill an area with a similar color or brightness with a gradient.
The most recently created but not yet committed gradient can be removed by pressing the ESC key. - allows you to fill an area with a radial gradient.
In combination with the Auto mask option, it allows you to fill an area with a similar color or brightness with a gradient.
The most recently created but not yet committed gradient can be removed by pressing the ESC key.
- Auto mask
 - an option that can be used with the fill tools listed above.
When this option is active, clicking on an area of the image to use a fill tool samples the color of the clicked area.
Then only the area similar in color and brightness to the sampled color is selected.
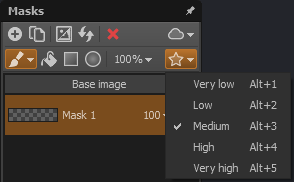
The similarity range can be adjusted by choosing the appropriate parameter from the list, opened by clicking the arrow located next to the Auto mask icon. - an option that can be used with the fill tools listed above.
When this option is active, clicking on an area of the image to use a fill tool samples the color of the clicked area.
Then only the area similar in color and brightness to the sampled color is selected.
The similarity range can be adjusted by choosing the appropriate parameter from the list, opened by clicking the arrow located next to the Auto mask icon.
- Invert
 - allows you to invert the current mask. This tool is useful when you need to create a copy of a mask with an inverted selection. - allows you to invert the current mask. This tool is useful when you need to create a copy of a mask with an inverted selection.
- Fill strength [100%] - allows you to set the opacity strength of the current fill tool.
- Reset
 - allows you to remove the fill from the current mask. - allows you to remove the fill from the current mask.
The mask tools work in two modes.
- Fill mode - when the left mouse button is used.
- Erase mode - when the right mouse button is used.
This mode also works with the Auto mask mode, which allows you to erase only areas similar to the one that was pointed to when clicking the right mouse button.
In addition to its name, each mask has two more parameters.
- Opacity value - defines the opacity strength of the mask.
- Mask activity - defines whether the mask is active.
The user can decide when the selected mask area is visible. When the  icon is checked,
the fill area of the active mask is hidden only while manipulating the image parameters. When the icon is not checked,
the fill area of the active mask is visible only when hovering the mouse over the mask in the masks panel.
The color used to display the mask fill area can be chosen from the list opened by clicking the arrow next to the icon. icon is checked,
the fill area of the active mask is hidden only while manipulating the image parameters. When the icon is not checked,
the fill area of the active mask is visible only when hovering the mouse over the mask in the masks panel.
The color used to display the mask fill area can be chosen from the list opened by clicking the arrow next to the icon.
The active mask is selected by clicking the mask in the masks panel. If you want to edit the base image, click the base image in the masks window.
When a mask is active, it is not possible to zoom the image or pan the image directly with the left mouse button.
It is also not possible to preview the image before the changes were applied, directly with the right mouse button.
To make this possible, hold down the SHIFT key before pressing the mouse button.
Editing a mask
A mask can be edited at any time, after first setting it as active.
Deleting a mask
A mask can be deleted by setting it as active and then clicking the  icon. icon.
|